The recently released SIGHTS (SART Integrated GUI and Host Teleoperation Service) software suite is designed to work with virtually any RMRC robot setup. However, with all that potential for customisation comes a lot of configuration. It can be daunting. Fortunately, my goal in this series of blogs is to de-mystify the extensive configuration file and allow you to implement SIGHTS on your robot, whether it be for the Rapidly Manufactured Rescue Challenge or something else entirely!
If you haven’t yet read our blog introducing SIGHTS, I’d recommend you check it out before proceeding to find out exactly what SIGHTS is all about.
Installing SIGHTS
After installing SIGHTS for the first time (again, see the original blog post), all you need to do is open the interface in your favourite browser. The IP address of your robot should be detected during the installation process like this:
Installation complete! Reboot to ensure proper functionality.

Visit http://localhost/ on the host machine or http://192.168.1.2/ on any device on the local network.
Using Config Files
Before we start configuring, I’ll quickly go over how to use the config files.
First things first, I’ve enabled dark mode by clicking the night icon. If you use a dark browser or Windows theme, this may have already been autodetected, otherwise, feel free to enable/disable it manually.
Now, focus your eyes on the toolbar at the top of the page.
![]()
First is an indicator showing the connection status of gamepad compatible controllers. Second is a dropdown list of available config files. Currently, the default virtual.json is selected. SIGHTS also comes with two other config files, dynamixel.json and sabertooth.json. These are example configurations for all motor types, which we’ll go into later.
Next are the host service controls for starting, stopping or restarting the SIGHTS service, as well as an indicator to show the current host service status. You’ll need to use this to restart after making any changes to your config file. Fortunately, restarting is quick and painless, usually taking less than 5 seconds from button-press to usable interface.
Further along are the WebSocket indicators. SIGHTS runs two WebSocket processes; one that controls the robot and one that receives sensor data.
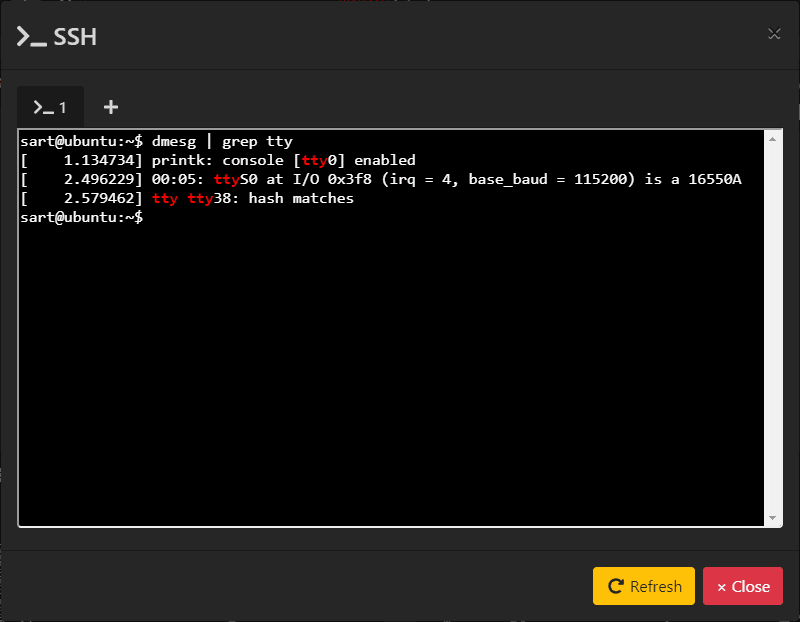
Over on the other side of the screen we have an SSH window with infinite tabs, a logs window with logs for everything you can imagine, SIGHTS documentation (opens in a new tab), a settings window, the aforementioned dark mode toggle, and finally power options for rebooting or powering off the host device.
Creating Your Config
Click on the “Settings” icon on the toolbar. There are three tabs here: “Configuration”, “Advanced Editor” and “About”.
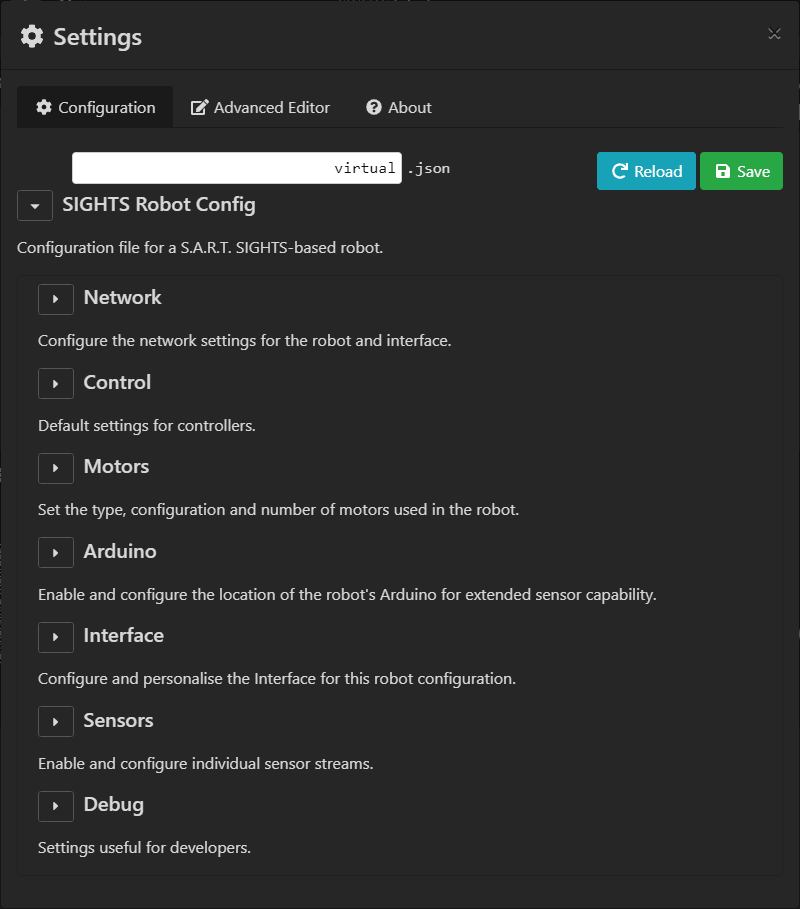
You can use the “About” tab to check for updates for SIGHTS software.
The “Advanced Editor” tab will offer the same functionality as the “Configuration” tab, but it may be quicker to use for experienced users. Since this is our first time making a configuration file, we’ll use the “Configuration” tab, since it offers a lot more information about what each setting does.
First, enter a name for your new configuration file and save it. Now, we can start configuring your new robot!
Configuring Your Robot
In this, the first part of “Make It Yours: Configuring SIGHTS”, I’ll just cover the basic configuration settings. The Interface and Sensors sections can get more complicated, so I will cover those in part 2. Most of the basic settings are very self-explanatory and will require little clarification from me. So, without further ado, let’s begin!
Network
The first section is Network containing one field, IP Address. It’s generally recommended to leave this as a wildcard.
Control
Next up is Control, where you can set the default speed of the motors.
We keep this at a low value by default so that it’s harder to accidentally drive your robot off a table, for example, when you’re testing. That happened to us on one occasion many years ago, resulting in a dead robot at RoboCup International Istanbul! But that is a story for another time.
If you haven’t yet had your hopes and dreams crushed by a runaway robot, or you like to live dangerously, you can change this setting.
Motors
After Control comes Motors. First, you’ll need to set a motor type. If your base config was virtual.json like mine, the currently selected option will be virtual. This allows you to run the robot with a virtual motor connection when you are testing without motors.
If you want your robot to move, you’ll need to change this to dynamixel or serial depending on what motors you’re using.
Dynamixel
The Dynamixel connection is tested on Dynamixel AX series servos. To establish a connection, you’ll need to set the Serial Port the servos are on (using a USB2Dynamixel or USB2AX or even an OpenCM 9.04 board like the one used in the original S.A.R.T. robot). If you’re unsure, you can open up an SSH terminal from the interface to check the connected serial devices with the command
dmesg | grep tty.
Next, set the Serial Baud Rate, typically 1000000 for Dynamixel.
The final step in creating a Dynamixel connection is creating the servo groups. Use the add (+) button to add the servo IDs (set in Dynamixel Wizard or using your preferred method) to a group on the left or right side of the robot. Groups need to be defined properly so that servos run in the correct direction.
Serial
The serial connection, like the Dynamixel connection, requires a Serial Port and a Serial Baud Rate (typically 9600). Similar to the Dynamixel servos, it requires you to specify which channel/s control motors on the left or right side of the robot.
Arduino
Legacy Arduino support is an option if you have an Arduino running legacy S.A.R.T. sensor code circa 2017-18. It’s currently not very well documented, and since we don’t use it anymore, we’re not even sure if it’s 100% functional. It may be updated in the future or removed altogether.
If you decide to test it out (or better yet, fix it up and contribute it to SIGHTS), you’ll need to specify the Arduino’s Serial Port and Serial Baud Rate here.
Interface and Sensors
As I mentioned before, we’ll be skipping over these for now, since they’re far more in-depth than the configuration options covered so far.
I’ll be posting “Make It Yours: Configuring SIGHTS Part 2” tomorrow, so stay tuned! 🙂
Debug
Since most of you reading this and trying SIGHTS on your robots have some experience with development, the debug settings may be of interest to you – especially if you decide to contribute to SIGHTS!
You can set the Log Level of the SIGHTS service to provide the amount of information best suited to your needs. This follows standard logging level ideology, meaning if you select a rather high level such as “debug”, all lower logging levels (info, warning, error, critical) are also logged.
By default, WebSocket messages sent between the console and interface are not logged to reduce log spam. However, you can enable this by checking Enable WebSocket Logging. I recommend you disable this if you’re using the debug logging level, since debug logs WebSocket messages through the Python WebSocket library.
Final Thoughts
So, that’s all there is to basic SIGHTS configuration! Don’t forget I’m covering the more in-depth Interface and Sensors sections in my next blog.
I hope you find the SIGHTS software useful when creating and experimenting with your robots.
PS: Don’t forget to click the save button when you’ve finished configuring!